RSS

Blog

Tail Light Lens Replacement.

Tail Light Lens Replacement Cost?


It depends on the type of car you drive and the auto repair shop you go to. 

CarLabor CostParts CostEstimateAverage Back Light PriceSavings
Honda/Toyota200-400 Rs400-1500 Rs600-1900 Rs3000 Rs65%


Broken Back Lamp Lens

A tail light lens is the colored piece of plastic that covers the light bulb on a vehicle’s tail light. Different colored lights have different meanings, so it’s important that the proper lens cover the light bulbs, which emit white light. When white light shows through a broken or cracked tail light lens, people following the vehicle may not realize that a car is slowing or stopping. Mostly vehicles may have glass lenses.


What common symptoms indicate you may need to replace the Tail Light Lens?

  • When a vehicle has a broken or missing tail light lens, other drivers may not realize that the vehicle is slowing down which can cause accidents.
  • Broken tail light lens.
  • Cracked tail light lens.
  • Missing tail light lens.

City 2009 Tail Lamp Lens GM1


Steps to Replace a Tail Light Lens

The following steps outline the procedure for replacing a tail light lens. While every make and model is different, drivers that tailor this process to their own car should be able to swap out their lens without a problem.


Step 1: Unscrew the Tail Light Assembly From Vehicle.

This step differs depending on the type of vehicle and the year in which it was built. For example, many cars, trucks, and SUVs built before 1990 have external screws on the tail lights that are easily identified from the outside. Modern vehicles typically have a more seamless look, and the screws are located underneath the hood on the car frame, in the interior of the car on the other side of the tail lights. Compact cars usually have screws in the trunk area, and on trucks, the screws are on the inside of the tailgate. Regardless of the type of vehicle, the first step is to locate the fasteners that hold the lens in place and unscrew them. This can be accomplished with a brief search around the tail light itself. Make sure to keep these screws in a safe place once they are removed.

Step 2: Remove the Bulb Sockets.

Remove the sockets from the back of the tail lights by twisting them counterclockwise. This should free the tail light assembly from the vehicle and prepare it for removal.

Step 3: Separate The Old Lens From The Assembly.

After inspecting the assembly and determining that the lens is the only damaged part, remove it from the rest of the tail light. On most vehicles, the lens is attached by several thumb nuts or small retaining screws and should pull away from the assembly freely once these are loosened.

Step 4: Insert The New Lens Into The Tail Light Assembly.

Carefully press the new tail light lens against the rubber gasket in the assembly and push it back into the mounting assembly on the rear of the vehicle. Tighten the retaining screws or thumb nuts to hold it in place.

Step 7: Secure The Assembly Into The Vehicle.

Tighten the screws and replace the bulb sockets on the back of the tail light assembly. Make sure to turn the sockets counterclockwise until they lock into place. If necessary, push the trunk trim back to its original position and then close the trunk.


All About Car Windscreen Wipers Blades And Rubbers

Windscreen Wipers

About Wipers, Rubbers and Blades

Windscreen wipers are very important for safe driving, especially at night. They are designed to effectively remove moisture and dirt from the front and rear windscreen, providing a clear view for the driver.

However, the soft rubber inserts are vulnerable to wear and tear from the elements and can be literally worn out with use. Contaminants and adverse conditions on the road can accelerate rubber deterioration, often resulting in chattering and streaking across the windscreen. Lack of use, due to storage or driving in dry climates can leave the rubber on the windscreen wipers cracked and brittle. The same applies to headlamp wipers too, and all rubber inserts should be checked regularly and changed when necessary.

Signs you may need to replace your windscreen wipers:

  • Chattering or streaking across the windscreen
  • Cracks or brittleness on the wiper
  • Smearing on the windscreen after use

Wipers and Washer

Windscreen Wipers

Genuine Wipers  have been designed especially for your car. When you get your car serviced by technicians, they will know to check the condition of the wiper blades and its rubber inserts.

To ensure maximum windscreen cleanliness, use the Windscreen Washer Additive. Giving the rubber blade a regular wipe with tissue will also help to clean off the build-up of grease and grime. This will help to maintain a clear view through the windscreen and keep your wipers working longer.

Brake Pads Noise

Do Your Brakes Squeak?

Any squeak in your vehicle can be annoying, especially if it continues to get worse and you do nothing about it. Here are four common types of squeaks that come from the brakes—common problems that come through the shop everyday—plus a fifth (bonus) brake noise, a scraping noise. I hope I can help you understand what's causing your brakes to squeak.

Two Types of Brakes

To make this discussion clearer I'll tell you that there are two types of brakes. Most brakes today are disc brakes, where a pad presses against a disc or rotor to stop the car. The first three squeaks described here come from disc brakes. Many cars have drum brakes on the back wheels, where a curved “shoe” presses against a hollow drum to stop the car. The last squeak here is made by drum brakes.


Getting rid of an annoying brake squeal and other disc brake noise is like trying to cure a bad case of herpes. You can treat the symptoms and improve the patient's condition. But it is virtually impossible to eliminate the underlying cause. Fortunately, brake noise is not caused by a virus. It is caused by a combination of factors that sometimes add up to create noise.

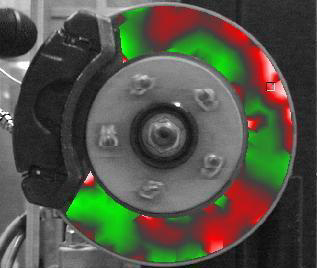
Brake squeal is really a high frequency vibration. In disc brakes, it can be caused by vibrations between the pads and rotors, the pads and calipers, or the calipers and their mounts. In the photo above, the noise produced by a brake rotor in a test lab has been captured electronically and converted into a color graphic. The red areas are producing the loudest noise while the green areas are producing the least noise.

In drum brakes, the vibrations can originate between the shoes and drums, or between the shoes and backing plates.

We can't say why brake noise is so annoying. It just is. To some people, it has the same effect as scraping your fingernails across a blackboard. They can't stand it, even if it is "normal" for many vehicles today. Most people want nice, quiet brakes that stop smoothly with a reassuring "shhhhh" sound. No scraping noises. No high pitched squeals that would make a dog howl. No concerned looks or stares from passengers, other motorists or nearby pedestrians who wonder if the vehicle is going to stop or not.

Disc brake noise can also be worrisome to many people because they fear something is wrong with their brakes and their vehicle might not be safe to drive. Noise may indicate trouble, but the only way to know for sure is to inspect the brakes. If you find nothing amiss (no worn linings, or loose, damaged or missing parts), then you can try any or all of the following measures to deal with the noise problem:

  • Dampen the pads
  • Lubricate the calipers
  • Replace the caliper hardware (slides, pins or bushings)
  • Replace the pads
  • Resurface the rotors
  • Clean the brakes (drums)


SHAKY PADS CAN CAUSE DISC BRAKE NOISE


One way to quiet noisy pads is to make sure the pads fit tightly in the calipers. If the pads on a single piston caliper have mounting ears or tabs that need to be bent or hammered to hold the pad in position, make sure the pad can't be wiggled by hand. If the pads have clips, shims or antirattle springs, make sure the necessary hardware is in place and properly installed. If you see no such items when you inspect the brakes, do not assume that none are needed. The last guy who worked on the brakes may have left them off. It is always a good idea to look up an illustration or parts list for the brake system to make sure all the required parts are there.

If the pads are installed correctly but are still noisy, one of the least expensive and most effective ways to quiet them is to remove the pads and install insulator shims on the backs of the pads. The shims, which are usually self-adhesive, act like little seat cushions to dampen vibrations between the pad and caliper.

Another option is to apply a noise suppressing compound to the backs of the pads. Some compounds harden to a rubber-like consistency to cushion the pads. Another good choice is to apply a moly-based brake lubricant to the backs of the pads. Brake lubricant is long lasting and won't burn or wash off like brake grease can. If applying a lubricant to the backs of the pads, be careful not to get any on the front side of the pads or rotor!

QUIETING THE CALIPERS

The same approach can be used on the calipers. Cleaning and lubricating the caliper mounts can also help dampen vibrations to quiet the brakes. Vibrations here can be caused by worn or loose mounts or mounting hardware.

If the calipers are badly rusted or worn, they may have to be replaced. But in most instances, you can probably clean them up, lubricate the mounting points and return them to service. You may have to replace the caliper slides, pins, clips and/or bushings, though, if there is too much play or looseness between the caliper and knuckle. Be sure to use a high temperature brake grease so the grease stays where it belongs.

NOISY BRAKE PADS

Some disc brake pads are noisy than others. Semimetallic pads are typically the ones that cause the most noise problems because they are harder than nonasbestos organic (NAO) pads. Their high metallic content often makes them squeal when metal rubs against metal.

The amount and type of fillers and binders in a friction material can make a big difference in the amount of noise a given set of pads or shoes produce. Ingredients such as graphite, carbon and "rubber modifieds" may be added to reduce noise. Brass is another ingredient that helps dampen noise (it also has a cleaning effect on drums and rotors). Many of the newest pads designed for quiet operation use a nonmetallic "ceramic-enhanced" formula to eliminate noise.

The design of the pads themselves can also affect the amount of noise produced. A chamfered leading edge on the pads eliminates the sharp edge so the pads will slide across the rotor without grabbing and vibrating. Slotting the pads changes the frequency at which the pads oscillate so noise can be tuned out of the brake system.

Some pads also have a special coating that transfers to the rotor surface when the pads are first used. The coating material leaves a film on the rotor that reduces noise, vibration and also rotor wear. The transfer film also makes the pads less sensitive to variations in the surface finish on the rotors.

If the original pads are too noisy and can't be quieted by insulator shims, noise compound or grease, therefore, replacing them may be the only way to get rid of the noise.

worn brake pads
These brake pads are completely worn out.
Brake pads should never be allowed to wear down to bare metal as this will also ruin your rotors.

BRAKE PAD REPLACEMENT

Some brands and grades of aftermarket brake linings are quieter than others. So you may have to experiment with several different ones to find the quietest set for a given application. But whatever you do, do not substitute asbestos or nonasbestos organic (NAO) pads for semimetallic pads unless the friction material supplier says it is okay to do so. Asbestos and NAO do tend to be quieter than semimetallics but can't withstand the heat that semimetallics can. Consequently, if you swap asbestos or NAO for semimetallics in a front-wheel drive car or minivan where the brakes run hot, it can reduce the life of the linings significantly (up to half or more!) and increase the risk of overheating and brake fade.

After you have installed the new pads, it is a good idea to break them in (unless the pads are the "fully cured" type that do not require an initial break-in period). Not breaking in a new set of pads increases your risk of pad glazing and brake noise. A driver can glaze and ruin a new set of pads if he fails to go easy on the brakes for the first 200 miles. If he overheats the brakes by mashing down on the brake pedal at every stop light, he can cook the resin in the pads before it can cure and glaze the pads.


Pads that require an initial break-in can usually be seated by making 20 to 30 easy stops from about 30 mph with at least 30 seconds between brake applications so the brake pads have enough time to cool.

Whether a new set of brake pads need to be broken-in or not, you should still test drive the vehicle to make sure the brakes are operating properly and that your efforts to eliminate the noise problem have been successful.

BRAKE ROTOR RESURFACING

Click for Brake Guide info

In addition to replacing the brake pads, it may be necessary to resurface the rotors to cure a noise problem. To brake quietly, the rotors have to be in good condition, relatively smooth and flat. So if the rotors are rough, glazed or have not been finished properly, they'll have to be resurfaced.

How smooth do the rotors have to be? OEM requirements vary, but generally speaking a surface finish that ranges anywhere from 15 to 80 microinches should be acceptable, though GM recommends a surface finish of 60 microinches or less. A smooth finish will reduce the risk of brake noise and brake squeal.

Unfortunately, there is no easy way to measure surface finish short of buying an electronic "surface profilometer," a device which drags a calibrated stylus across the surface to measure roughness. Profilometers are expensive and nobody except brake part and equipment suppliers can afford to buy them. So the next best way to check your work is with a "surface comparator gauge." This type of gauge, which is available from machine shop suppliers as well as some gasket manufacturers, generally costs less than $50 and has sample patches on a metal plate that you feel or scratch with your fingernail to compare finishes.

Another way to check the surface finish on a rotor is the ball point pen test. Write you name on the rotor. If the ink leaves a continuous line, the surface is smooth enough. But if the ink line is broken up into dots, the surface is too rough (or coated with grease!).

How the brake rotors are resurfaced does not matter as long as they end up with a high quality smooth finish. Bench lathes and on-car lathes are both capable of high quality finishes when used properly. But both require sharp tooling and the right feed rate and spindle speed or drive speed to produce a good finish that resists brake noise. For best results, many experts recommend using round lathe bits. These will produce a smoother finish (up to twice as smooth as a new rotor!).

If the crossfeed rate is too high, the lathe bit can groove the rotor like a phonograph record. There will be too much space between the peaks and valleys on the surface of the rotor making it unacceptably rough and noisy. What you want are narrow peaks and valleys. This may require you to slow down the crossfeed rate or adjust the spindle or drive speed (if possible).

Specific operating recommendations will vary with the type of equipment you are using, but if you are turning rotors on a lathe with a fixed spindle speed (100 rpm) and a fixed crossfeed rate of .003 in. per revolution, you should get a suitable finish. On lathes with adjustable spindle speed and crossfeed, a speed of 100 rpm with a crossfeed of .002 to .008 in. should give satisfactory results. A silencer band or vibration dampening attachment should be used while turning the rotor to eliminate tool chatter.

After the rotors have been turned, you can sand them with #150 grit sandpaper to smooth the surface finish. Press two sanding blocks against both sides of the rotor while it is turning slowly on a bench lathe for about 60 seconds. Or, you can do the same thing with a "Flex-Hone" tool for rotors made by Brush Research Manufacturing. The flexible beaded abrasive on the Flex-Hone tool works better than an abrasive pad in a drill. The key point here is to achieve an EVEN surface finish with no high spots or low spots on the rotor.

A final step that is often overlooked but is just as important as any of the others just mentioned is to clean the rotors after they have been turned. Use warm soapy water and a stiff brush. Aerosol brake cleaner is NOT as effective and won't remove metallic debris that can become embedded in the new pads you have just installed. To check cleanliness, wipe a clean white raga across the surface of the rotor. If you see any gray streaks on the rag, the rotors are NOT clean.

To reduce the risk of brake noise during pad break-in, there are aerosol "brake silencing treatments" that can be applied to rotors to help suppress noise. These are spray-on coatings that are applied to the rotors after they have been resurfaced. Some contain microfine aluminum particles, graphite and moly that fill in the valleys on the surface of the rotors and act as a temporary lubricant to help the new pads burnish in more gradually. This not only reduces brake noise but also helps the pads develop a better cure which actually increases the coefficient of friction slightly, according to one supplier of this type of product.

DRUM BRAKE NOISE

One of the leading causes of brake squeal in drum brakes is brake dust inside the drum. Removing the drum and cleaning the brakes, therefore, may be necessary to eliminate this kind of noise. Use an aerosol brake cleaner or brake washer to clean the brakes. Never, ever blow out the drums with compressed air because doing so blows zillions of microscopic fibers into the air, which you certainly want to avoid if the vehicle has asbestos linings.

Another cause of brake noise in drums is poor contact between the shoes and drum. Heel and toe contact between the shoe and drum is often the culprit, and the cure is to either replace the shoes with new ones or to resurface the drum slightly to increase its inside diameter. New shoes are ground with a slight eccentric to compensate for drum wear. This moves the point of contact away from the ends of the shoes toward the middle. In the old says, mechanics used to arc shoes to match their shape to the drum. But with the concerns about asbestos, shoe grinding is pretty much a thing of the past (though it might make a comeback if and when asbestos is totally out of the picture).

Other causes of drum noise can include weak or loose hardware (replace it), and vibrations between the shoes and the raised pads on the backing plates (apply brake grease).

Battery Maintenance

Battery Maintenance

Battery Maintenance is an important issue. The battery should be clean. Cable connection needs to be clean and tightened. Many battery problems are caused by dirty and loose connections. Serviceable battery needs to have the fluid level checked regularly and only at a full charge. The fluid level will always be higher at a full charge. Distilled water is best; tap water is loaded with chemicals and minerals that are harmful to your battery, but not as bad as no water. Don't overfill battery cells especially in warmer weather. The natural fluid expansion in hot weather will push excess electrolytes from the battery. To prevent corrosion of cables on top post batteries, use a small bead of silicon sealer at the base of the post and place a felt battery washer over it. Coat the washer with high temperature grease or petroleum jelly (Vaseline). Then place cable on post and tighten, coat the exposed cable end with the grease. Most folks don't know that just the gases from the battery condensing on metal parts cause most corrosion.


Battery Testing

To measure specific gravity buy a temperature compensating hydrometer at an auto parts store. To measure voltage, use a digital D.C. Voltmeter.


You must first have the battery fully charged. The surface charge must be removed before testing. If the battery has been setting at least 6 hours you may begin testing. To remove surface charge the battery must experience a load of 20 amps for 3 plus minutes. Turning on the headlights (high beam) will do the trick. After turning off the lights you are ready to test the battery.


State of ChargeSpecific GravityVoltage - 12VVoltage - 6V
100%1.26512.76.3
75%1.22512.46.2
50%1.19012.26.1
25%1.15512.06.0
Discharged1.12011.906.0


* Sulfation of Batteries starts when specific gravity falls below 1.225 or voltage measures less than 12.4 (12v Battery) or 6.2 (6 volt battery). Sulfation hardens the battery plates reducing and eventually destroying the ability of the battery to generate Volts and Amps.

Load testing is yet another way of testing a battery. Load test removes amps from a battery much like starting an engine would. A load tester can be purchased at most auto parts stores. Some battery companies label their battery with the amp load for testing. This number is usually 1/2 of the CCA rating. For instance, a 500CCA battery would load test at 250 amps for 15 seconds. A load test can only be performed if the battery is near or at full charge.

The results of your testing should be as follows.

  • Hydrometer readings should not vary more than .05 difference between cells in a strong healthy battery.
  • Digital Voltmeters should read as the voltage is shown in this document. The sealed AGM and Gel-Cell battery voltage (full charged) will be slightly higher in the 12.8 to 12.9 ranges. If you have voltage readings in the 10.5 volts range on a charged battery, which indicates a shorted cell.

When in doubt about battery testing, call the battery manufacturer. Many batteries sold today have a toll free number to call for help.


Selecting and Buying a New Battery

Selecting a Battery, when buying a new battery I suggest you purchase a battery with the greatest reserve capacity or amp hour rating possible. Of course the physical size, cable hook up and terminal type must be a consideration. You may want to consider a Gel-Cell or an Absorbed Glass Mat (AGM) rather than a Wet Cell; if the battery is not or can not receive regular maintenance, as it should. This is a hard call, because there is very little that substitutes for maintenance.


Be sure to purchase the correct type of battery for the job it must do. Remember an engine starting battery and deep cycle batteries are different. Freshness of a new battery is very important. The longer a battery sits and is not re-charged the more damaging sulfation build up on the plates. Most batteries have a date of manufacture code on them. The month is indicated by a letter 'A' being January and a number '4' being 2004. C4 would tell us the battery was manufactured in March 2004. Remember the fresher the better. The letter "i" is not used because it can be confused with #1.


Battery Life and Performance

Battery life and performance, average battery life has become shorter as energy requirements increase. Two phrases heard most often are "my battery won't take a charge and my battery won't hold a charge". Only 30% of batteries sold today reach the 48-month mark. In fact 80% of all battery failure is related to sulfation build-up. This build up occurs when the sulfur molecules in the electrolyte (battery acid) becomes so deeply discharged that they begin to coat the batteries lead plates. Before long the plates become so coated the battery dies. The causes of sulfation are numerous, let me list some for you.


  • Batteries sit too long between charges. As little as 24 hours in hot weather and several days in cooler weather.
  • Battery storage, leaving a battery sit without some type of energy input.
  • Deep cycling engine start battery, remember these batteries can't stand deep discharge.
  • Undercharging of battery, to charge a battery let's say 90% of capacity will allow sulfation of battery using the 10% of battery chemistry not reactivated by the incomplete charging cycle.
  • Heat of 100+°F, increases internal discharge. As temperatures increase so does internal discharge. A new fully charged battery left sitting 24 hours a day at 110 degrees F for 30 days would most likely not start an engine.
  • Low electrolyte level, battery plates exposed to air will immediately sulfate.
  • Incorrect charging levels and settings. Most cheap battery chargers can do more damage than help.
  • Cold weather is hard on the battery the chemistry does not make the same amount of energy as a warm battery. A deeply discharged battery can freeze solid in sub zero weather.
  • Parasitic drain is a load put on a battery with the key off.


Battery Charging


Battery charging, remember you must put back the energy you use immediately, if you don't the battery sulfates and that affects performance and longevity. The alternator is a battery charger; it works well if the battery is not deeply discharged. The alternator tends to overcharge batteries that are very low and the overcharge can damage batteries. In fact an engine starting battery on average has only about 10 deep cycles available when recharged by an alternator. Batteries like to be charged in a certain way, especially when they have been deeply discharged. This type of charging is called 3 step regulated charging. Please note that only special SMART CHARGERS using computer technology can perform 3 steps charging techniques. You don't find these types of chargers in parts stores and Wal-Marts. The first step is bulk charging where up to 80% of the battery energy capacity is replaced by the charger at the maximum voltage and current amp rating of the charger. When the battery voltage reaches 14.4 volts this begins the absorption charge step. This is where the voltage is held at a constant 14.4 volts and the current (amps) decline until the battery is 98% charged. Next comes the Float Step, this is a regulated voltage of not more than 13.4 volts and usually less than 1 amp of current. This in time will bring the battery to 100% charged or close to it. The float charge will not boil or heat batteries but will maintain the batteries at 100% readiness and prevent cycling during long term inactivity. Some AGM batteries may require special settings or chargers.

How To Regular Check Car Batteries

Batteries

Your car's battery is what supplies energy to the starter motor, electrical & ignition system. For hybrid/electric vehicles, the battery also supplies traction. Car batteries require regular inspection and maintenance, which involves checking the fluid level; checking that terminal clamps are attached properly; and checking that the battery clamps are holding the battery securely.

Car Batteries

Battery

batteries new flat-top design includes an innovative flat-top lid. The lid provides a contemporary appearance, as well as having indicators for the state of charge and fluid level indicators for easy diagnosis. batteries are specifically suited to vehicles and Australian driving conditions. They are designed to:

  • Fight Corrosion Batteries have a thick-cast positive grid, stronger alloy components and involve double dip production.
  • Combat Fluid Loss Fluid loss due to the electrolysis that occurs during charging means that the battery may require fluid top ups. Batteries combat water loss with special alloy components and hybrid design plates. They also feature an inbuilt start of charge and fluid indicator.
  • Combat Vibration batteries are built with stronger components and internal welds as well as a mud rack design that reduces plate movement.
  • Enable Superior CyclingFor optimal performance, batteries include a heavy duty component with increased paste coating and are designed to handle accessory loads when idling.


How To Maintain Car Tyres

Tyres


About Tyre Care and Safety

The condition of your car's tyres is an important element in the overall safety of you and your passengers. Tyres, although built to last, are subjected to all sorts of road conditions and driving styles, exposing them to extreme wear and tear.

 
Tyre wall

There are some DIY checks that you can do between scheduled services to help ensure your tyres are safe and last as long as they should. In particular, maintaining the correct pressure is the most basic part of tyre care you can do yourself - and it makes a huge contribution to getting the best performance, economy and safety from your tyres.

Additionally, your driving style can affect the life and condition of your tyres. Smooth, attentive driving helps optimize tyre efficiency and lifespan, whereas an aggressive driving style will wear your tyres out much faster, regardless of whether you're driving with correct tyre pressure or wheel alignment.

How to Maintain Your Tyres

Check your tyre pressure regularly

  • We recommend checking tyre pressure every week, while the tyres are cold - and don't forget the spare.
  • Incorrect tyre pressure adversely affects grip on the road, ride comfort, fuel consumption and overall tyre performance.
  • Different driving conditions require different pressures. For example, a higher pressure is usually recommended for high-speed driving or when carrying or towing a heavier than normal load.
  • Under-inflated tyres, when used on hard roads (as opposed to sand or mud), can be unresponsive when steering and braking and lead to increased and uneven wear.
  • Details relating to the correct pressure should be available from the tyre information placard on your vehicle.

Check tyre condition

  • Tyres will wear with use and pre-maturely from poor alignment or erratic driving styles. To ensure safety, tyre tread depth must be at least 1.6mm or more to help ensure the tyre sticks to the road when braking, cornering and will help to avoid aquaplaning in wet conditions. Bald tyres (less than 1.6mm) are unsafe and need to be replaced immediately.
  • In particular, tyre wear on front-wheel-drive vehicles is a little higher.
  • Look for cracks and bulges in the side walls, and nails that may have pierced but not punctured the tyres.

Wheel Balance and Alignment

  • During vehicle servicing, our technicians will check that all your wheels are precisely balanced, to ensure all sections of the tyre rotate evenly on the road, minimising undue wear.
  • If required, we can check and realign your wheels, which is necessary when your vehicle tends to stray to the left or right when driving, or wanders about on a straight stretch of road.
  • Correctly balanced and aligned wheels will ensure a Genuinely Better ride without vibrations. It will also aid in responsive steering and help you gain maximum mileage from your tyres.
  • Wheel alignments can be necessary between scheduled servicing if you hit a curb or large pothole. Your wheel settings should be checked as soon as possible after such contact. Rough roads or aggressive driving can also be contributing factors.
Rotating tyres

Wheel Replacement and Selection

  • If you need to replace a wheel due to damage or to enhance the appearance of your vehicle, we'll ensure the new wheels provide the same load capacity, diameter rim width and offset.
  • It's important to be aware that differences in tyre type can adversely affect vehicle handling, wheel bearing life, brake cooling, headlight aim and the calibration of your speedometer.
  • Your  Service Centre can show you a comprehensive range of alloy wheels specifically designed for your car.

Alloy Wheels

  • All cars have their own range of alloy wheels designed to enhance the appearance of each vehicle while maintaining performance and safety.
  • If you install alloy wheels or have them rotated, we recommend that you recheck the tightness of the wheel nuts after the first week of driving.
  • To help avoid damaging alloy wheels, use the car wheel nuts and wrench designed for your specific wheels.

Rotating Wheels


  • To even out tyre wear across all tyres and extend tyre life, you should rotate your tyres from 5,000km, depending upon your driving habits and road conditions.


Shock Absorbers

Shock Absorbers

Shock absorbers, as the name accurately implies, work with the car's suspension to absorb the affects of bumps and holes in the road. The most obvious benefit of shock absorbers is that they provide a smooth, comfortable ride over various surfaces and roads.

Shock Absorber

Not so obvious is the safety role they play in your car's handling and steering - particularly in maintaining steering and stability. However, for such a vitally important part of your car's safety system, there are big differences in the quality of shock absorbers.

Signs you might need new shock absorbers:

  • Unresponsive steering
  • Abnormally bumpy ride

Genuine Shock Absorbers

Genuine Shock Absorber section

There are two main features that determine the quality of shock absorbers:

  • Individual Models Shock Absorbers are specifically designed for each individual model to optimise handling performance and suspension safety. From the piston structure to the connective bushings, every Shock Absorber is designed for perfect fit. Many non-genuine shock absorbers are 'one size fits all' designs for a variety of cars regardless of individual requirements.
  • High Quality Materials Shock Absorbers include Teflon? processed piston bands and piston rods which are specially coated for superior rust resistance. These long-lasting parts work smoothly to reduce noise and bumps to make driving a pleasure. Many non-genuine shock absorbers avoid using Teflon? and other protective measures, reducing longevity and performance substantially.

Shock Absorbers are designed for longevity and performance, shock absorbers will always be inspected according to the servicing schedule.

Automotive Drive Belts

Drive Belts

In order to operate, your car engine relies on many other 'helping hands' around it. These include the cooling fan, water pump, power steering pump, alternator, and air conditioning compressor. All must work in perfect harmony to provide electrical charge, cooling, and other energies for safe, comfortable driving. All of these components rely on one piece of equipment, the drive belt, to perform their many mechanical tasks. Drive belts quite literally keep the many wheels of the engine turning.

Drive Belt diagram

Drive Belts will last 60,000 to 100,000km with normal use, but this can vary greatly due to harsh operating conditions. Signs and effects of a worn out drive belt:

  • A worn out belt may slip and become noisy
  • Reduced cooling efficiency
  • Improper battery charging
  • Problems with the power steering or air conditioning
  • Any visible damage to the belt
Drive Belt

Drive Belts

The role of a drive belt is to keep the many auxiliary components attached to your engine, turning. 

Individual Models Drive Belts are specifically designed for each individual model for perfect fit and tension between the various components they must drive. Many non-genuine drive belts are 'one size fits all' designs that can either be too loose, or too tight - either way, they can dramatically reduce the performance of relevant equipment.

  • High Quality Materials With a rubber coated bottom layer to prevent cracking to heat-resistant tensioning members, Genuine Drive Belts are multi-layered for maximum longevity and performance.

Drive Belt Types

There are several different types of drive belts available - each performs an individual role according to the equipment it drives and engine type. These variations are:

  • Raw Edge BeltsIn plain, multi-ply and cogged configurations for passenger cars, trucks and buses including diesels.
  • V-Ribbed BeltsThese are thinner and more efficient in transferring power, and are used in small and high performance engines.

Drive Belts will always be inspected for wear and/or replaced according to the servicing schedule.


Toyota Corolla
Toyota Corolla Toyota Corolla Toyota Corolla Style (2016 European version).jpg Toyota Corolla, international model Overview Manufacturer Toyota Motor Corporation Production 1966–present Body and chassis Class Subcompact car (1966–1991) Compact car (1991–present) Chronology Predecessor Toyota Publica
Engine Oil

Engine Oil

Changing your engine oil and filter regularly is one of the most important procedures you can do to extend the life and performance of your vechile. If you do a lot of stop/start driving, drive in dusty, dirty conditions or do a lot of towing you should change your engine oil more frequently (either by time or distance, as recommended in your service handbook). Always ensure that your oil filter is changed every time your engine oil is.

Oils And Lubricants
  • Motor Oils have been specifically formulated  to suit the diverse driving conditions your vechile may encounter.
  • The engine oil provides complete engine protection against starting friction, heat stress and engine sludging for better performance and maximum engine life.